First Steps
| 1 Predefined Experiment
1.1 Setup 1.1.1 Creating the Database (database.xml) 1.1.2 Importing the Prolog Data (import.xml) 1.2 MILK 1.2.1 Propositionalization (proper-mi.xml) 1.2.2 Exporting to ARFF (export-mi.xml) 1.2.3 Evaluating (evaluate-mi.xml) 1.2.4 Further Steps 1.3 RELAGGS 2 User-defined Experiment 2.1 Setting up the Database 2.2 Importing the Data 2.3 MILK 2.3.1 Propositionalization 2.3.2 Export (classified Examples) 2.3.3 Export (unclassified Examples) 2.3.4 Evaluate 2.3.5 Classify 2.4 RELAGGS 2.4.1 Propositionalization 2.4.2 Export (classified Examples) 2.4.3 Export (unclassified Examples) 2.4.4 Evaluate 2.4.5 Classify 2.5 REMILK 2.5.1 Propositionalization 3 Other stuff |
1 Predefined ExperimentHere we show how an already defined experiment, the East-West-Challenge, is carried out.The corresponding ANT files are each time mentioned. All mentioned menu items are found in the "Experiment" section. 1.1 SetupFor this we execute the menu item "Setup".You can change properties of the ANT file temporarily for a run by clicking on "Options" and editing them. With "Reload" you restore them to the ones stored in the file. 1.1.1 Creating the Database (database.xml)• Choose "Database" from Steps• Highlight "eastwest" in the Datasets • Click on "Start"  1.1.2 Importing the Prolog Data (import.xml)• Choose "Import" from Steps• Highlight "eastwest" in the Datasets • Click on "Start"  1.2 MILKFor this we execute the menu item "MILK".1.2.1 Propositionalization (proper-mi.xml)• Choose "Proper" from Steps• Highlight "eastwest" in the Datasets • Click on "Start"  1.2.2 Exporting to ARFF (export-mi.xml)• Choose "Export" from Steps• Highlight "eastwest" in the Datasets • Click on "Start"  1.2.3 Evaluating (evaluate-mi.xml)• Choose "Evaluate" from Steps• Highlight "eastwest" in the Datasets • Click on "Start"  1.2.4 Further StepsThere are also two more steps for some other experiments:• Classifying of unknown instances (classify-mi.xml) • Testing the built classifier against a test set (test-mi.xml) 1.3 RELAGGSHere the same steps are performed like with MILK, but starting from the menu item "RELAGGS".(the ANT files have the same name, but without the "-mi") 2 User-defined ExperimentInstead of adding new Experiments to existing ANT files (import.xml, export.xml, etc.) Proper also offers the possibility to create ANT files for single experiments.This is quite useful, since an experiment has to be included in all the standard ANT files and not just the one where it is needed. Let's say, if we just want to test different classifiers or different export schemes, we can do this easily with the so called "Builder". The "Builder" is an easy way to "click" ones way to an experiment: it automatically creates ANT files with the calls of the necessary Java classes and the necessary parameters. For this purpose we need to Tools, both of them found in "Experiment" section, in turn (since we're building up the experiment incrementally, i.e. setting up and testing): • Builder (for generating the ANT file) • Run (for executing the experiments) We show the use of the Builder exemplary at the dataset of the East-West-Challenge (the representation of the dataset differs a little from the previous one). One last thing about the handling of the Builder before we start with the experiment: 2.1 Setting up the DatabaseEither start the Builder or if it is already started create a new Experiment by selecting the menu item "New".Since we want to create the database and the Builder only checks and saves the ticked Steps, make a tick at "Database" 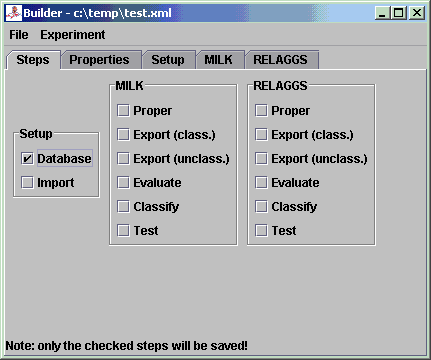 When we change to the Database tab, we see that the database name is a placeholder.  We can either change the name here or do this in the properties (recommended), e.g. "first_experiment" (underscore instead of blank!).  After changing the name we save the experiment:  Now we're ready for the first test, i.e. we'll have to execute the "Run" menu item and open the previously saved file (via "Add" - it is possible to add more than one ANT file here):  Since we now only have one target to execute, we don't have to choose it. If we don't choose specific targets, all of them are executed (can take a long time if one is not careful ;-)). We start the execution by clicking on "Start".  If no errors occurred we can continue with the next step... 2.2 Importing the DataSince we now want to import the data into the database we'll have to check the Step "Import":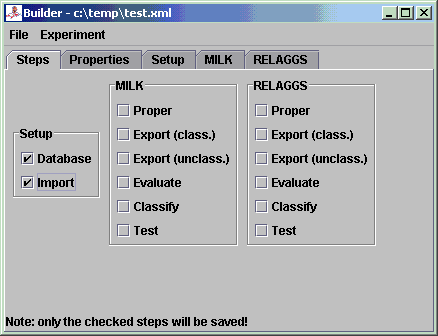 After changing back to the Import tab, we'll have to choose the file(s) we want to import. The East-West-Challenge consists of a relational Prolog database with Positive and Negative examples, so we check "Pos./Neg. Examples" and open the file "20trains.pl" in the datasets directory beneath "trains2":  Since we also have unclassified examples, we check this and open the file "100trains.pl"  By saving these changes and reloading the ANT file in the Run-Window, we should get an output like this after a successful run:  2.3 MILKNow we want to prepare the Propositionalization of the data, which is just to create one table out of the relational database. The target we're interested in, is the direction the trains are going: east or west.From now on we don't show explicitly which Step to tick, since it is obvious from the headings of the following pararaphs. 2.3.1 PropositionalizationFirst we choose the table "eastbound_" (by connecting to the database and selecting the database "first_experiment") Next we choose the field "eastbound1", which contains the direction of the trains  The rest of the default parameters are just the way we need them. After a successful run we get an output like this:  2.3.2 Export (classified Examples)For the export of the classified examples, i.e. the training examples for our classifier, we only need to set "Field" (our class in the ARFF file) to "eastbound1" in the "_relaggs" table. 2.3.3 Export (unclassified Examples)As with the classified examples we only have to set "Field" to "eastbound1" again2.3.4 EvaluateThe next step is to train our classifier on the given training set, which we exported via "Run".We can either use the standard classifier, which is J48 or choose another WEKA-Classifier (it is recommended to change the classifier in the Properties-Tab, since the updating of one value for a placeholder is easier and less error prone).  After running the Evaluation in "Run" we should receive this output:  One error source can be that the project name contains a blank. 2.3.5 ClassifyOur previously exported unclassified examples can now be labeled with the Classification step. The default values are sufficient for this. 2.4 RELAGGSThe next tool we want to parametrize, is RELAGGS, which is based on aggregation of the adjacent tables around the main table where the target attribute is located.2.4.1 PropositionalizationLike in MILK we choose "eastbound_" as the "Table" and "eastbound1" as the "Field" to use in the propositionalization step.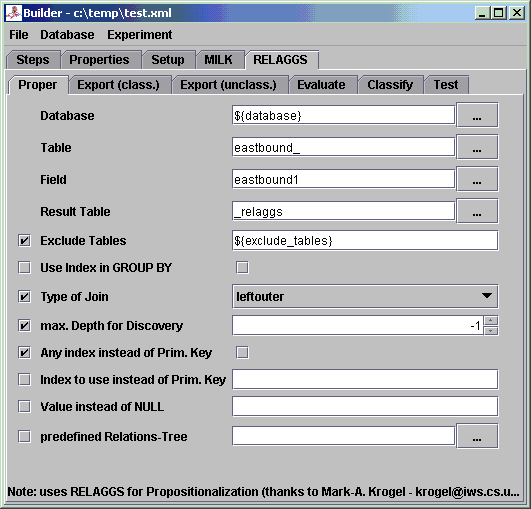 Which results in an output like this:  Note: That "c_, eastbound_list0_, l_" are listed in the left over tables is absolute correct. RELAGGS only aggregates the directly adjacent tables, so that the tables "c_" and "l_" wouldn't be touched. Hence we create temporary tables (with the prefix "_relaggsed") that resemble joins of the branches. 2.4.2 Export (classified Examples)Here we only have to set "Field" to "eastbound1" in the table "_relaggs" 2.4.3 Export (unclassified Examples)Again set only "Field" to "eastbound1" in the table "_relaggs" 2.4.4 EvaluateThe same as with MILK, the only difference is that you can choose a normal WEKA classifier instead of a MILK classifier.2.4.5 ClassifyThe same as with MILK, the only difference is that you can choose a normal WEKA classifier instead of a MILK classifier.The resulting ARFF file with the labeled instances can be viewed with the ArffViewer:  2.5 REMILKThe parametrization of REMILK is basically the same as with the previous ones. We only want to explain the Propositionalization in short, where the join of the MILK and the RELAGGS table happens.2.5.1 PropositionalizationThe values that can be entered here are the same as with the ones from MILK and RELAGGS with only one exception:you can also define a field for the join of the two tables. In some cases it can happen that the wrong column or none at all can be determined automatically. If this is the case you can specify a field here, that acts as the join column, normally would this be the bag column.  3 Other stuffThe generated statistic ARFF files can be evaluated with the following script:scripts/evaluate.shIt creates CSV files (US and DE) and LaTeX-Tables. The CSV files that are generated can be inserted in the following MS Excel template that contains some useful Macros for visualization: docs/_experiments.xltA general template for exporting Excel tables to LaTeX is the following: docs/_latex_table.xlt |